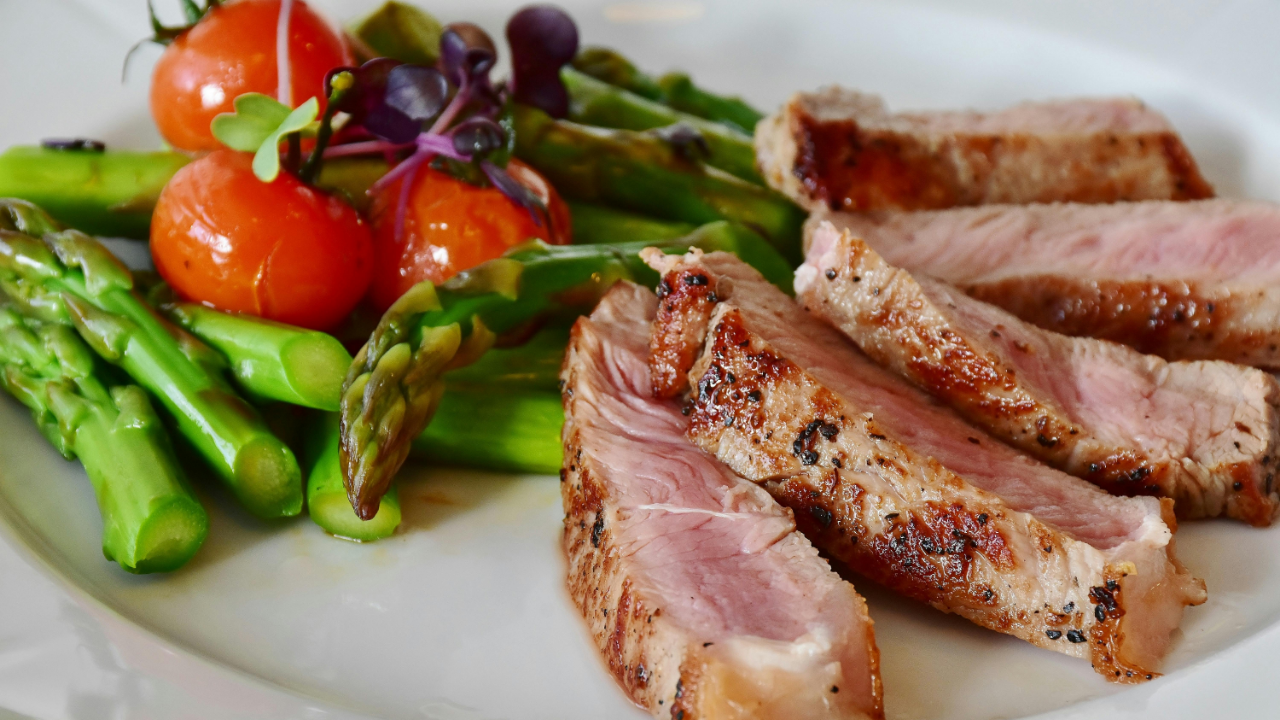
Imagine sinking your teeth into a perfectly cooked steak, bursting with flavor, and melting in your mouth with each bite. What if I told you that achieving this culinary nirvana is not just a distant dream but a tangible reality? Today, we embark on a journey to uncover the secrets behind tempering steaks before cooking them to perfection using our Meat°it 3 thermometer, a culinary technique and tool that will revolutionize the way you approach steak cooking forever. Discover why you should temper steaks now.
Tempering steaks is the process of allowing them to come to room temperature before cooking. This simple yet crucial step can significantly impact the flavor, texture, and overall quality of your steak.
In this comprehensive guide, we will explore the myriad benefits of tempering steaks, diving into the science behind this technique, debunking common myths, and equipping you with practical tips and tricks to achieve perfectly tempered steaks every time.
The Science Behind of Tempering steaks
Meat is composed of muscle fibers, connective tissues, and fat. Understanding how these components interact during cooking is essential for mastering the art of steak preparation.
Temperature plays a crucial role in protein denaturation and collagen breakdown, both of which contribute to the texture and tenderness of the meat.
Tempering steaks ensures that the meat cooks evenly throughout, resulting in a juicy and tender steak with perfect sear on the outside.
Benefits of Tempering Steaks
- Enhanced flavor development:
Tempering allows the natural flavors of the meat to shine through, resulting in a more flavorful steak. When the steak is brought to room temperature before cooking, it allows the natural flavors inherent in the meat to shine through, creating a more robust and satisfying taste profile. This means each bite bursts with succulent, mouthwatering goodness, making for a truly memorable meal.
- Improved texture and tenderness:
By bringing the steak to room temperature before cooking, you allow the muscle fibers to relax, resulting in a more tender and juicier steak. This relaxation of the muscle fibers leads to a softer, more tender texture, making every mouthful a pleasure to savor. The juiciness that accompanies this tenderness adds another dimension of enjoyment to the eating experience.
- Consistent cooking results:
Tempering ensures that the steak cooks evenly, eliminating the risk of overcooking or undercooking certain parts of the meat. Whether it’s the center or the edges, each portion cooks evenly, eliminating the dreaded scenario of overcooked exteriors and undercooked interiors. With tempering, you can bid farewell to culinary disappointments and confidently serve up perfectly cooked steaks every time. Check out our article on Understanding Meat Doneness levels for more insights on the topic.
How to Temper Steaks
Step-by-step guide to tempering process:
We’ll walk you through the simple yet essential steps to properly temper your steaks before cooking:
- Remove the Steak from Refrigerator: Start by taking the steak out of the refrigerator and placing it on a clean plate or cutting board. Allow it to sit at room temperature for about 30 minutes to 1 hour, depending on the thickness of the steak.
- Season the Steak (Optional but highly recommended): While the steak is tempering, this is an ideal time to season it with your preferred spices or marinade. Ensure the seasoning is evenly distributed over the surface of the steak for maximum flavor.
- Preheat Your Cooking Surface: While the steak is tempering, preheat your grill, skillet, or oven to the desired cooking temperature. This ensures that the cooking surface is hot and ready when you’re ready to cook the steak.
- Pat Dry the Steak: Before cooking, pat dry the surface of the steak with paper towels to remove any excess moisture. This helps achieve a better sear and prevents steaming during cooking.
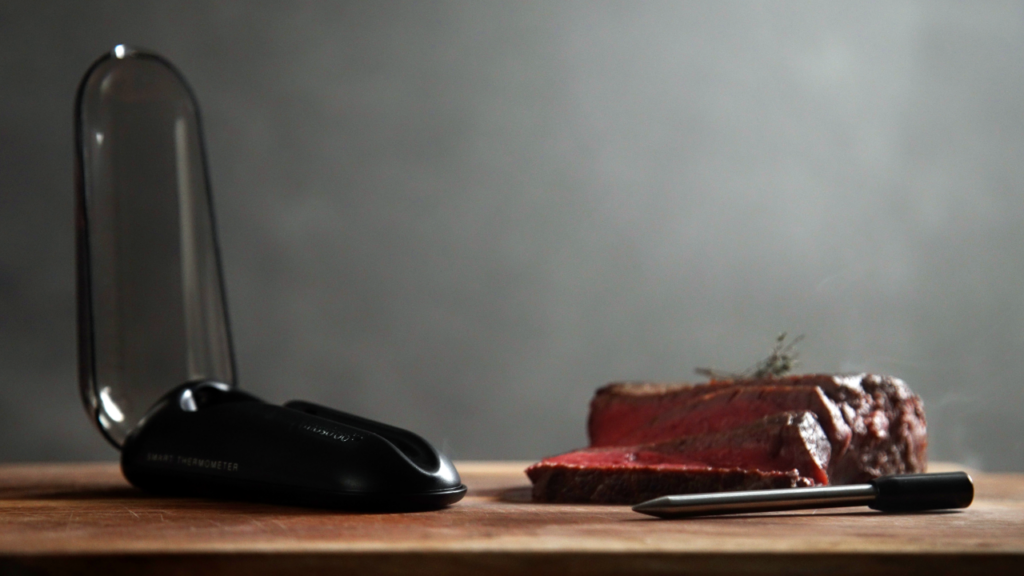
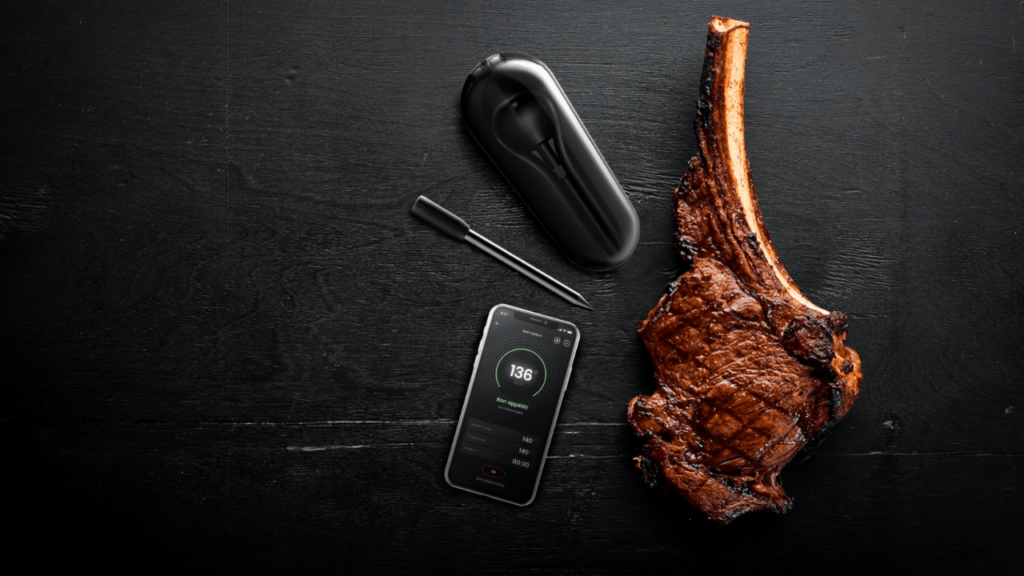
- Cook the Steak: Once the steak has reached room temperature and the cooking surface is preheated, it’s time to cook the steak using the Meat°it 3 thermometer according to your preferred method that you can choose in the cooking app. Whether you’re grilling, pan-searing, or baking, ensure to follow the app’s suggestions to reach the desired results.
- Rest the Steak: After cooking, allow the steak to rest for the few minutes recommended by the app before slicing and serving. This allows the juices to redistribute throughout the meat, resulting in a juicier and more flavorful steak.
By following these simple steps, you’ll ensure that your steaks are properly tempered before cooking, resulting in delicious and perfectly cooked meals every time.
Tips for selecting the right cuts of meat:
- Consider Thickness: Opt for cuts of meat that are relatively uniform in thickness. Thicker cuts, such as ribeye or strip loin, are ideal for tempering as they allow for more even cooking throughout the steak.
- Look for Marbling: Marbling refers to the intramuscular fat within the meat, which adds flavor and juiciness. Choose cuts with ample marbling, such as ribeye or sirloin, as they tend to yield more succulent and flavorful results when tempered.
- Choose Boneless Cuts: While bone-in cuts can add flavor and moisture to the meat, they may require longer cooking times and can be challenging to temper evenly. Opt for boneless cuts, such as filet mignon or strip steak, for easier and more consistent tempering.
- Consider Cooking Method: Different cuts of meat are better suited to various cooking methods. For example, tender cuts like filet mignon or ribeye are well-suited for grilling or pan-searing, while tougher cuts like flank steak or skirt steak may benefit from marinating and slow cooking methods.
- Quality Matters: Invest in high-quality cuts of meat from reputable sources. Quality meat not only tastes better but also tends to cook more evenly and retain moisture, making it ideal for tempering.
By keeping these tips in mind, you can select the best cuts of meat for tempering, ensuring delicious and perfectly cooked steaks every time. Check out our article on The Advantages of cooking with a wireless meat thermometer to learn more about the great benefits of adding this gadget to your kitchen.
Recommended tempering times for different cuts:
Different cuts of meat require varying tempering times to achieve optimal results. We’ll provide you with guidelines for tempering various cuts of steak:
- Thin cuts (e.g., flank steak, skirt steak):
- Temper for approximately 20-30 minutes at room temperature.
- Thin cuts require less time to temper due to their reduced thickness.
- Medium cuts (e.g., sirloin, New York strip):
- Temper for approximately 30-45 minutes at room temperature.
- Medium cuts strike a balance between thickness and tenderness, requiring moderate tempering times.
- Thick cuts (e.g., ribeye, filet mignon):
- Temper for approximately 45 minutes to 1 hour at room temperature.
- Thick cuts benefit from longer tempering times to ensure even cooking and maximum tenderness.
- Bone-in cuts (e.g., T-bone, porterhouse):
- Temper for approximately 45 minutes to 1 hour at room temperature.
- Bone-in cuts may require slightly longer tempering times due to their denser structure.
- Specialty cuts (e.g., wagyu beef):
- Temper according to the thickness and marbling of the meat, typically 45 minutes to 1 hour at room temperature.
- Specialty cuts like wagyu beef may require additional tempering time to allow the marbling to soften and distribute evenly.
By following these recommended tempering times based on the type and thickness of the cut, you can ensure that your steaks are properly tempered and ready for cooking, resulting in delicious and perfectly cooked meals every time.
Common Misconceptions and Myths about tempering steaks
Tempering is unnecessary: Some believe that tempering steaks is an unnecessary step in the cooking process. They may think that cooking the steak straight from the refrigerator yields the same results.
- Debunking: Tempering allows the steak to cook more evenly, resulting in a juicier and more tender final product. Skipping tempering can lead to uneven cooking and less flavorful steaks.
Tempering can lead to foodborne illness: There’s a misconception that leaving meat out at room temperature for tempering can promote the growth of harmful bacteria, leading to foodborne illness.
- Debunking: While it’s true that meat should be handled safely to prevent foodborne illness, tempering for a reasonable amount of time (30 minutes to 1 hour) is generally considered safe. The surface of the steak will reach a safe temperature quickly, and proper cooking will eliminate any harmful bacteria.
Tempering makes the steak lose moisture: Some believe that tempering steaks before cooking causes them to lose moisture, resulting in dry and flavorless meat.
- Debunking: Proper tempering actually helps the steak retain moisture during cooking by allowing the muscle fibers to relax. This results in a juicier and more flavorful steak, not a dry one.
Tempering is only necessary for certain cuts of meat: There’s a misconception that tempering is only required for thicker cuts of meat, such as ribeye or T-bone steaks.
- Debunking: While thicker cuts benefit from longer tempering times, tempering is beneficial for all cuts of meat. Even thinner cuts like flank steak or skirt steak can benefit from a brief tempering period to ensure more even cooking.
By debunking these common myths surrounding the practice of tempering steaks, we can better understand the importance of this technique in achieving perfectly cooked and flavorful meat.
Tips and Tricks for Perfectly Tempered Steaks
- Preparing the grill or cooking surface:
- Properly preheating your grill or cooking surface is essential for achieving a perfect sear on your steaks.
- Ensure that your grill grates are clean and well-oiled to prevent sticking and promote even cooking.
- For indoor cooking methods like pan-searing, preheat your skillet over medium-high heat until it’s hot enough to sear the steak upon contact.
- Use a wireless meat thermometer like the Meat°it 3 for the perfect result every time. The cooking app provides on time heat temperatures, making reaching a perfect juicy steak a easy mission for everyone.
- Seasoning techniques:
- Discover the best seasoning techniques to complement the natural flavors of your tempered steaks.
- Consider using a simple seasoning blend of salt, pepper, and garlic powder to enhance the steak’s flavor without overpowering it.
- Experiment with different seasoning mixes, marinades, or dry rubs to add depth and complexity to your steak’s flavor profile.
- Resting and slicing recommendations:
- Learn why resting your steaks after cooking is crucial and how to properly slice them for maximum flavor and tenderness.
- Allow your steaks to rest for 5-10 minutes or according to the Meat°it 3 cooking app after cooking to allow the juices to redistribute evenly throughout the meat.
- When slicing your steaks, be sure to cut against the grain to shorten the muscle fibers, resulting in a more tender bite.
- Use a sharp knife to achieve clean and even slices, ensuring each bite is as enjoyable as the last.
By following these tips and tricks, you’ll be well-equipped to prepare perfectly tempered steaks that are bursting with flavor and tenderness, guaranteed to impress even the most discerning palates.
Recipe and Cooking Ideas
Sample recipes featuring tempered steaks:
1-Classic Grilled Ribeye Steak:
- Marinate ribeye steaks in a simple blend of olive oil, minced garlic, salt, and pepper for at least 30 minutes.
- Preheat the grill to medium-high heat, insert the Meat°it 3 and grill the steaks for 4-5 minutes per side for medium-rare doneness or choose you desired level in the cooking app and follow the instructions recommended.
- Let the steaks rest for 5 minutes before slicing and serving. Pair with a baked potato and a side of sautéed vegetables for a classic steakhouse experience.
2-Pan-Seared Filet Mignon with Red Wine Reduction:
- Season filet mignon steaks with salt and pepper and let them temper at room temperature for 30 minutes.
- Heat a skillet over medium-high heat, insert the Meat°it 3 and sear the steaks for 3-4 minutes per side until golden brown and cook to your desired doneness by following the instructions recommended by the cooking app.
- Remove the steaks from the skillet and let them rest while you prepare the red wine reduction sauce.
- Deglaze the skillet with red wine, scraping up any browned bits, and simmer until reduced by half. Serve the filet mignon drizzled with the red wine reduction and accompanied by mashed potatoes and roasted asparagus.
Pairing suggestions for side dishes and accompagnements:
Creamy Garlic Mashed Potatoes:
Whip up a batch of creamy mashed potatoes infused with roasted garlic for a comforting and indulgent side dish that pairs perfectly with steak.
Grilled Asparagus with Lemon Butter:
Toss fresh asparagus spears with olive oil, salt, and pepper, then grill until tender and lightly charred. Finish with a drizzle of lemon butter sauce for a bright and flavorful accompaniment.
Roasted Brussels Sprouts with Balsamic Glaze:
Roast Brussels sprouts in the oven until caramelized and tender, then toss with a sweet and tangy balsamic glaze for a delicious and nutritious side dish that balances the richness of the steak.
These recipes and pairing suggestions are sure to elevate your tempered steak dining experience, whether you’re hosting a special occasion or simply treating yourself to a gourmet meal at home.
Conclusion
Tempering steaks isn’t just a culinary technique; it’s a game-changer that can elevate your steak cooking skills to new heights. Are you ready to take your steak cooking to the next level? Try tempering your steaks with the help of our wireless meat thermometer the Meat°it 3 in your next culinary experiment and experience the difference for yourself. Mastering the art of tempering steaks is not just about cooking; it’s about embracing the nuances of flavor, texture, and technique that transform a simple steak into a culinary masterpiece. Embrace the journey, experiment with different cuts and seasoning blends, and savor the satisfaction of a perfectly tempered steak. For more, you can check out Orka’s latest addition the Meat°it 3, and read about what Tasting Tables has got to say about making dinner parties easier using our wirelesss digital thermometer. Bon appétit!